“fred barr”by spartangreen293 is licensed under CC BY 2.0![]()
![]()
How To Test A Golf Cart Battery Charger
Owning a golf cart often requires you to upgrade and maintain your cart in a variety of ways.
For example, you need to make sure that your golf cart battery is fully charged before you ride your cart.
However, this unit may suffer from issues that decrease its effectiveness over time.
Therefore, you need to understand how to test your battery charger to ensure that it works as effectively as possible.
Thankfully, this process is relatively simple and shouldn’t take you too much time.
We’ll address the testing process, here, as well as why testing is smart and what issues you might discover.
Why Golf Cart Battery Testing is Smart
Although a good golf cart battery charger is typically in great shape for years without the need for upgrades, there comes a time when this unit may end up wearing down.
A multitude of issues can trigger decreased charger effectiveness, such as wiring problems, complications with the operating elements of the charger, and a variety of other issues.
As a result, testing is usually a good idea for golf cart owners.
Testing schedules will vary based on a variety of factors but is typically done at least once a year.
However, some may want to test their batteries two, three, or even four times a year.
Just a few reasons why testing is a great choice for your golf cart battery charger includes how it:
- Ensures Strong Batteries – If your battery charger is in great shape, then your batteries will fully charge whenever you use this device. As a result, they’ll be stronger and will hold their charge longer than if you utilize a charger that didn’t work as well.
- Catches Potential Electrical Problems – As time passes and your charger ages, there’s a good chance it may suffer from some type of electrical problem. When this issue occurs, you’ll need to test the charger to ensure that it doesn’t short out when you try to power a battery.
- Enhances Battery Life – Completely draining a battery and properly recharging it will help to ensure that it retains a stronger charge life and will help your golf cart run smoothly even after you have stopped using it for the season for an extended period.
These benefits make the process of testing more than worth the difficulty.
And since most tests will take no more than 10-15 minutes to perform – once you’ve mastered the skill – there’s no reason that you can’t test your golf cart battery charger at least once a year.
However, if you use your cart extensively – including putting more than a few miles on it every day – more frequent tests are smart.
Frequent tests help because you’ll be using the charger more often and may cause issues by improperly placing the battery on the charging pad.
You may also trigger complications if you let the battery charge for too long or don’t maintain the structure of your charger’s exterior.
Thankfully, the common test is something that just about any golf cart owner can handle on their own.
The Process of Golf Cart Battery Testing May Vary Slightly
Although testing your battery charger is typically rather easy to handle without too much difficulty, some people may experience complications because they aren’t adequately prepared.
Most of these situations occur because they don’t take into account the design of their golf cart’s battery and the way that the charger interacts with it when installed.
For example, chargers by Club Car utilize a slightly different design from EZGO chargers because their batteries have somewhat different looks and mechanical styles.
These differences aren’t minor and need to be fully understood before you buy a charger.
For example, Yamaha models typically have more charging pegs than others because of the size and complexity of the batteries that they use.
Just as importantly, you need to take into account the charging capacity of the battery that you plan on using.
The smallest model is around six volts, which will charge your battery well but a little slower than other models.
The eight-volt model is an excellent middle ground and should give you a balance between charging speed and cost. And the 12-volt gives you the fasted speed but costs the most to purchase.
These differences will affect what kind of readings you can anticipate when testing your battery as well as what to expect during the testing process.
Make sure that you thoroughly read the manual of your charger before you try to verify its charging capacity.
Just as importantly, you need to fully understand the necessary testing process outlined below to get an idea of what to expect from this not simple but not exactly challenging process.
The Basic Process
Testing your battery charger requires a variety of steps that will not only gauge the charger itself but your battery and even the cart.
The basics of this process include how you should:
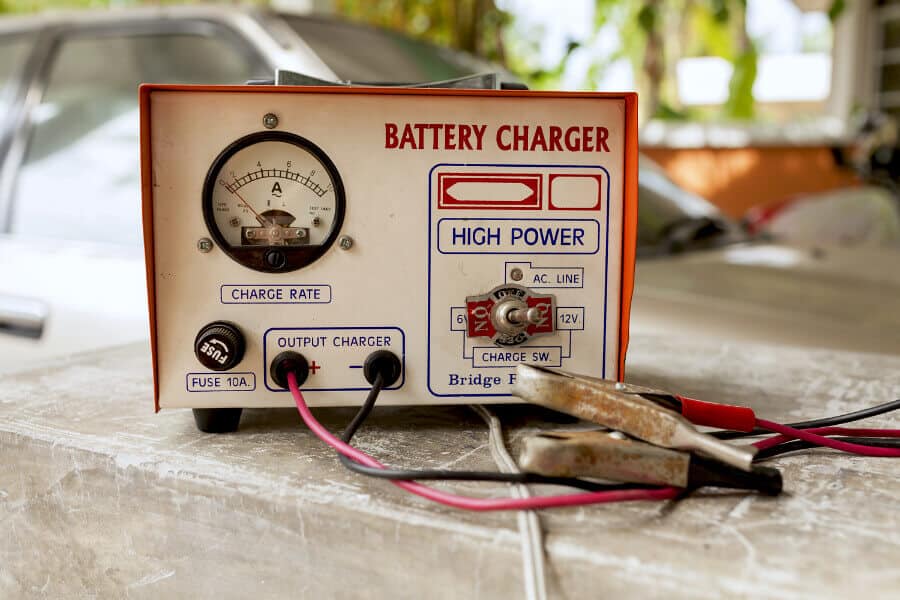
- Connect your Batter to a Voltmeter – A voltmeter is a tool that checks the charging capacity of a battery charger and ensures that it runs smoothly. Make sure that you connect the clamps to the proper pegs on the battery to ensure that you get the best reading and to avoid shorting out your voltmeter. If you need a voltmeter, we recommend an Etekcity meter based on cost, ease of use, and great accuracy:
 Etekcity Digital Multimeter, AC DC Voltmeter Amp Volt Ohm Current Meter, Electrical Voltage Outlet Circuit Tester With Continuity Resistance Diode Test ,Two Build-In Ceramic Fuses, Red, MSR-R500
- Accuracy: With 3/s Sampling Speed, this multimeter can accurately measure AC/DC Voltage, DC current (Not for AC current), Continuity, Amp, Resistance and Diode
- Widely Used: This meter is capable of testing Household Outlets, Batteries (including 12V Automotive Battery), Continuity, Electrical Circuit, Fuses, Wires, Light Bulbs and Water Heaters
- Multi-Feature: Large Backlight LCD Display with 3 ½ digits (1999 count) delivers your results clearly in dim light areas; Data Hold button holds a reading; Built-in Stand allows for hand free use; Low Battery Indication and Continuity Buzzer
- Safety-Feature: This meter complies with CAT Safety Standard; 2 Build-In Ceramic Fuses and the Rubber Sleeve provide Safer and Better Protection; Overload Protection is active on All Range
- NOTE: This multimeter cannot be used to test AC current; Please make sure the rotary switch is located at the right range during use
- Turn on the Charger – Once you have the voltmeter attached to your battery charger, turn on the charger to read the electrical output. Typically, the needle on the voltmeter will move from left to right – with right being higher – to gauge the amps produced. A reading of about 36 amps is typical for a battery charger.
- Gauge Any Charging Issues – If your charger isn’t putting out enough power when you turn it on, you need to detach the voltmeter – after turning off the charger – and try to assess the source of the problem. This troubleshooting requires a few simple tests and steps.
- Inspect for Dirt and Grime – Over time, your battery or the charger may experience dirt and grime buildup that can affect how well your charger operates. Make sure to clean off these stains from both units to ensure that they run properly and to avoid charging issues.
- Examine the Cables – When your battery charger doesn’t produce power, you need to check all of the cables for frays or other types of damage that could cause issues. Typically, this damage includes breaks in the cable or even a simple disconnect at the charger site.
- Listen to the Battery Transformer – If fixing the wires didn’t get your charger to start working properly again, you should turn it back on and listen to the humming of the battery charger. A humming sound indicates that the transformer is working, but no hum is a serious issue that may require transformer replacement.
- Check the Wiring Circuitry – Open your owner’s manual and check the wiring diagram for your golf cart battery charger and the way it connects to the cart. Trace all of these circuits to ensure that they are hooked up properly. If they aren’t, reconnect them – or replace wires as needed – to ensure that your charger runs well.
- Inspect the Grounding Wire – A small wire should come off of your battery charger and attach to the metal frame of the engine housing. This wire is the grounding wire that ensures your charger runs smoothly. Check to see if this wire is disconnected from the charger and reconnect it to the metal frame if it is not attached.
- Inspect the Fuses – Your battery charger – and your golf cart – typically have a series of fuses that blow if the electrical output gets too high. Find these fuses on both your cart and your battery and adjust them properly – including switching any blown fuses or replacing burned out ones.
- Check Battery Terminals – Carefully pull the caps off of your battery terminals to check the liquid inside of the battery. If you find that the liquid is gray or brown, then your battery is too old or degraded to charge any more – in most cases, this issue is typically the last one you’ll notice.
Most common maintenance repairs on the 48 Volt and 36 Volt Golf Cart Battery
All of these issues are common problems that affect golf cart battery chargers and typically require repairs of some sort.
Some cart owners may have the skills to handle these repairs, but others should seek out professional help to ensure the process goes smoothly.


what is voltage coming from the transformer