
Golf carts are pretty safe vehicles to drive because they don’t have a lot of potential dangers that can trigger problematic situations.
However, there may be times when you need to cut the power IMMEDIATELY on your cart and kill the power flow directly from the battery.
In this situation, you’re going to need a cut-power kill switch to immediately stop power flow and keep your cart safe.
What is a Cut-Power Kill Switch?
This switch is a vital part of your golf cart because it helps you cut the power during an emergency situation and ensures that your cart doesn’t get damaged.
This type of switch is not standard in a golf cart because they are not used often and are not practical to add to a large fleet of vehicles.
However, they are fairly easy to install if you understand the process and a little electrical work.
But just what does the switch do and what situations may demand its use?
Imagine yourself driving a golf cart when the brakes give out.
You can’t turn off the cart as it is running, so you hit the cut-power kill switch.
The battery is immediately turned off and power no longer provided to the wheels.
As a result, you will slow down and won’t get into an accident as you ride your cart.
And this type of switch can be important if there is a short or power issue in your cart that suddenly causes a power surge.
For example, a short may trigger a fire in your cart that can spread rapidly and cause widespread damage to its structure in unpredictable and upsetting ways.
But with the kill switch, you stop all power from flowing and can stop the short from a fire.
Items You Need Before Installation

So if you are worried about this type of problem and want to keep your cart in proper operating shape, you should consider installing a battery kill switch on your golf cart.
Before you start, though, you’re going to want to buy a handful of different items that protect you from damaging your cart and yourself and which makes it easier to handle the installation process on your cart.
You’ll need a pair of working gloves and goggles to protect your hands and eyes from damage.
Though you’re not likely to get hurt in this situation, there is a possibility so make sure that you are as safe as possible.
You’re also going to need a couple of tools – a wrench for loosening the connections on your battery, a screwdriver for attaching the switch, and a drill for boring a spot for your switch.
Once you have all of these items, you may also want to place your golf cart in a spot that makes it easier to work.
Typically, we think it is a good idea to place the cart in a garage where it can be safe from rain, wind, and other types of weather elements.
We also suggest placing a sheet beneath the cart that can catch any item that you might drop while you are working on the cart.
That doesn’t mean that you can’t work outside if needed.
However, you should place bricks behind the wheels of your cart and keep it in neutral (with the switch between the forward and reverse position) to ensure that it doesn’t roll.
Try to find a spot that is as level as possible if you do work outside and you shouldn’t have as much difficulty keeping your cart safe and from moving too far.
How to Install a Golf Cart Cut-Power Kill Switch
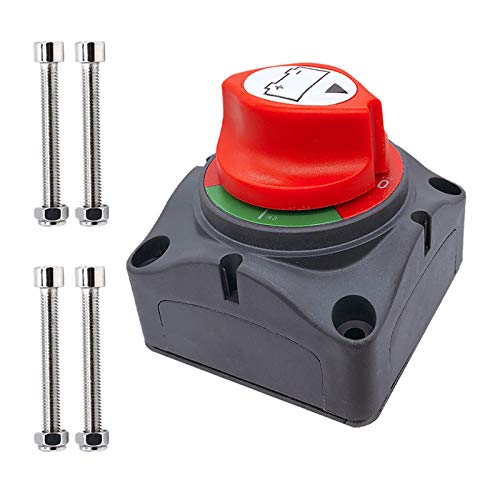
- Heavy Duty: ABS plastic housing, durable made for safety use, rear cover insulates terminals against any short of circuits, equiped with 4 sets of bolts.
- Specification: On/Off 2 positions, 275 A continuous at DC 12V, 455 A intermittent at DC 12V, 1250 A momentary at DC 12V.
- Compatible: used for DC 12 - 48 V systems to isolate and secure the electrical system, can stand alone or be locked together with other switch.
- Purpose: eliminate any power draw from the battery when vehicle or boat is not in use, disconnects the battery safely.
- Copper terminal stud size: 3/8" (10 mm) x 2, very easy to install, universal used for car, vehicle, Rv and boat, also electrical equipment's switch.
You may be trying to watch installation videos for this process or staring at your cart with no idea of how to even start this process.
Never fear: we are here to help.
The following process will get your kill switch working just fine and in no more than afternoon of work.
We estimate an installation time of about 30-60 minutes, depending on how well you can perform each step.
Those with more experience may be able to perform this process even faster.
And we are quite sure you can do it without expert help, but don’t hesitate to reach out to a mechanic if you feel uncertain about any of these steps.
1. Choose the Best Kill Switch
A good battery kill switch must be carefully chosen to ensure that you don’t run into any issues with cart operation.
For example, the switch needs to be compatible with the power level of your cart.
Some switches are suited for different levels and cannot be added to certain types of vehicles.
And this installation mistake is a huge concern because it can cause damage to your cart if left to worsen.
You can also try to match the brand of your kill switch to that of your cart – often, cart manufacturers focus on producing these types of items for specific models.
This step makes selection easier because the manufacturer has already done all the hard work of matching up the proper electrical output with that of your switch, making it much simpler to match up your switch with your cart’s power output.
2. Remove the Cables Properly
Open up your battery container and find the proper battery for your kill switch.
If your cart is a gas model, it will only have one battery – making this process much easier.
If it is an electric, you may have multiple batteries from which to choose.
Pick a battery that meets the power needs of your kill switch and get ready to remove the cables from the terminals of your battery.
It is critical to make sure that you connect your negative cable first and to hold it away from the positive one until that cable is disconnected from its terminal.
Now, you can wipe away any dirt and debris that may be on the terminals, the wires, and any other connections on the battery.
Doing so will help to keep it operating smoothly and prevent damage that may spread and become very upsetting.
3. Connect the Wires for the Kill Switch
At this point, you are now ready to add your kill switch wires to your battery.
Your switch should have two wires coming from it that include both a positive and negative wire.
Place the proper wires in place on the terminal, twisting them around the terminals until they are in place.
Some may even have small washers that you can use for this purpose, which helps to decrease the installation difficulty.
Make sure that you have properly installed the wires and check your switch to see what position it is in – you should have it in the on position BEFORE you install.
If you do not, remove the wires and switch it back to on. It needs to be in this spot because if you have it in the off position, you’ll get power but not when in the on position.
Though not a huge deal – you can adapt to it easily – it may be a problem if somebody else is driving your cart and doesn’t understand.
4. Add the Wires Back to the Battery
Now that you have connected your wires for the kill switch to the battery, you need to add the cables for the battery back to their terminals.
Again, you need to make sure that you follow these steps properly because you may cause sparks or shorts in your battery if you aren’t careful with how you reconnect the cables.
We suggest starting with the positive terminal and screwing it back into place.
Next, put the negative cable on its proper terminal and secure it tightly.
Tighten the screws until they fit snugly against the battery and kill switch wire connections.
Don’t tighten too much, though, because you may damage the wires and even the battery if you aren’t careful.
Thankfully, you should have a pretty good idea of when the terminals are snug because the screw won’t tighten any more without effort.
5. Identify Where You Want the Switch
Your switch just needs to be attached to a proper area of your cart to make it easier to use.
There are a few schools of thought on how you can approach this step.
Some people like the kill switch in a very obvious location that they can hit without thought.
However, some may not appreciate this choice because it can make the switch easier to hit by accident and cause issues with cart operation.
Others may want to put the switch in a place that is harder to reach, such as under their dash or even under the seat.
The choice is yours to make, but we suggest placing it somewhere that is covered but within arm’s reach.
You don’t want to have to stand up, lift the seat, and find the switch when an emergency is occurring.
However, installation on the lip of the bottom of your seat is a good idea.
6. Put the Switch on the Frame
Wherever you decide to install it, you need to drill a hole in the cart chassis where you can slide it.
You are going to need to pull the switch through various parts of your cart – beneath or behind the chassis or frame – to get it into proper position after you drill the hole.
Use any tighteners or wire holders you may have to hold the wires to the frame of the cart, if needed, and push the switch into the hole.
To make this process easier, you may want to use a black marker to measure out a hole location on your cart before you cut.
You’ll then need to use your drill to cut away the plastic where you want to put the switch.
Then, you must cover the connections with silicone caulk to protect it against the weather and stop it from getting damaged.
Make sure to also caulk around the edges of the switch.
7. Test the Switch for Proper Operation
Now, you need to test the switch to see how well it is operating.
We suggest starting up your cart and leaving it parked.
As the cart runs, wait for a few minutes and then hit the kill power switch.
Your cart should immediately turn off and stop your electrical flow the moment you hit the switch.
If the switch does not work properly, you need to check the wiring connections to see if they have worked loose or are frayed in any way.
This will require you to get back underneath of your cart where you have pulled the wires, so make sure you’re prepared to handle that kind of work.


Leave a Reply
You must be logged in to post a comment.