
Tuning up a gas-powered Club Car golf cart can ensure that it runs more smoothly and give you the confidence to operate it.
Thankfully, the steps involved are things that you should be able to handle, even if you have little experience with cart maintenance.
These steps should work on most Club Car models, though the information contained in each may vary according to your cart model and other considerations.
How To Tune Up A Club Car Golf Cart

Tuning up a Club Car golf cart requires checking the air flow of the engine, making sure that the fuel is as clean as possible, fixing any spark plug problems, and then testing the results.
This process also requires you to gather up a handful of tools that will make tuning up your golf cart much smoother.
These steps require you to be very careful with how you remove screws, hoses, and other elements from your engine.
Beyond that, you also need to make sure that you don’t tighten or loosen your adjustment screws too much when tuning up, as this may cause some complications with cart operation.
Step One: Collect Your Tools

The first step that you need to take when tuning up a Club Car Golf Cart is to collect every tool that you’ll be using for this process.
Though there are surprisingly not that many needed for this procedure, you will need to make sure that they are appropriate for your cart and easy to use.
For instance, you’re going to need a flathead screwdriver to carefully unscrew any elements in your cart and to adjust various items in the engine.
You’ll also need a socket wrench with a spark plug socket to remove your plugs and to get them operating as smoothly as possible.
You’ll also need a T15 Torx driver, a specialized screwdriver that you’ll likely have to order online or find in a specialized shop for your golf cart.
Then you’ll need a pair of needle-nosed pliers that you can use to adjust difficult elements on your cart.
With these items, you have all the tools that you’ll need.
In most cases, it isn’t likely that you’ll need a jack or a small and wheeled mechanic’s cart to get underneath your cart.
This is usually only needed if you have problems with fluid flow or your axles need to be checked and confirmed.
And if you do, it is a good idea to get a professional to fix these concerns for you to avoid complications or worsening conditions.
Step Two: Carefully Check The Air Flow

The air flow of your engine is liable to end up suffering if you don’t take the time to tune up your cart and keep it smooth.
Air flow is important because it helps to cool the engine and keeps it from getting too hot to run as you drive it and also provides a mixture of oxygen to your fuel.
The main steps that you’ll perform here are to check and potentially replace the air filter and inspect and replace the air hose connecting your air filter to your carburetor.
Doing so should take no more than five minutes, at the most, unless you have a hard time finding the air filter box or struggle to remove the filter or the hose.
Thankfully, most cart owners should be able to handle these steps with relative ease, even with fairly minimal mechanical experience:
- Raise your golf cart seat up as far as possible to get easier access to your engine.
- Lift the cushion of your seat from the brackets of the hinge to ensure it opens smoothly.
- Slide the double-eared tab of your seat out of the hinge slot to remove the seat and make tuning easier.
- Look for your air filter box in the engine, which is usually a black plastic box in most Club Cars.
- Carefully use your screwdriver to remove these screws and open the box.
- Check the air filter for any damage and inspect its surface for excessive dirtiness.
- Replace the filter if it is brown or black or use compressed air to clean the dirt out if possible.
- Leave the air filter in place if it is white or hasn’t yet become completely brown or black.
- Find the hose coming off of the air box to the carburetor and check it for any cracks or splits.
- Remove this hose if it is damaged and replace it with a new one to keep your air flow smooth.
Once you are done with these steps, your air flow should be improved, and your cart should experience fewer overheating problems.
Make sure that you move on to the next steps in this order, as well, because each can influence the next and needs to be done in a pretty specific way.
Step Three: Inspect Your Fuel Tank And Gas

A gas-powered golf cart most often suffers from engine troubles if the gas tank or other gas-related areas on the cart are allowed to deteriorate.
This problem is often quite complex for many to understand and usually requires a lot of specialized steps to properly manage.
That doesn’t mean that you can’t handle them on your own if you have the proper tools and a basic understanding of a cart engine.
In this process, you’ll not only be checking the fuel itself but looking at the fuel filter, paying attention to your gas tank, and taking other steps to keep it safe.
The steps that you need to follow are included below in as much detail as is necessary to get you started on this care:
- Find the fuel tank on your cart, which is usually on the passenger side of the engine well.
- Open the top of the gas tank—or check the clear side—and inspect the color of the gas.
- If the gas has a light color and not a dark amber tone, it is safe to leave in the cart.
- If the gas looks old and sludgy, use a specialized gas-removal tool to get it out.
- Wait to add new gas to the engine until after the rest of these steps are finished.
- Look at the fuel filter to see if it is opaque and has no fuel in it.
- Carefully remove the fuel filter and touch the back with a paper towel to look for residue.
- Replace the filter if it has a black and sludgy buildup on its back.
- Use the Torx T15 screwdriver to take off the cover hiding the adjustment tools.
- Remove the fuel line and exhaust vent tube with the pliers to get easier access to the screws (replace them when done).
- Identify the “A” screw (throttle adjustment) and “B” screw (air mix adjustment).
- Turn the “A” screw until it touches the plate and go one-quarter turn more.
- Close the “B” screw tightly and then back one and one-quarter turns.
After you’re done with these steps, replace any elements that you unhooked and carefully put the cover back into place.
This step will help to provide a better air flow for your fuel but also balance its intake to ensure it doesn’t get too rich.
Step Four: Adjust The Spark Plug Setup
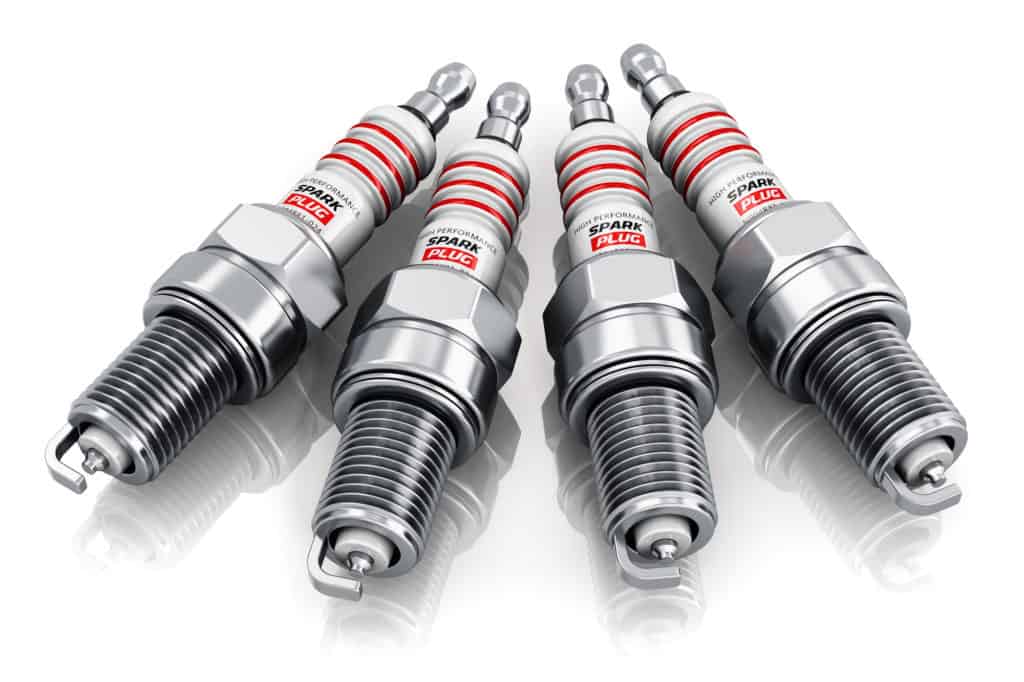
Your Club Car golf cart should have a single spark plug that provides the engine with the literal spark that it needs to run properly.
This plug is usually quite easy to maintain and requires very little specialized work to properly balance and check.
Unlike in automobiles, the spark plug setup is quite basic and doesn’t require adjusting a variety of different setups to ensure that it runs smoothly.
Follow these steps to spot any potential problems with your spark plug and to gauge whether it is time to replace it:
- Identify the spark plug setup at the top of your engine, which should be quite easy.
- Remove the cable attached to the spark plug using the proper tools you’ve collected.
- Place the spark plug socket and ratchet on your wrench and use it to remove the spark plug.
- Look inside the insulated area where you just removed the spark plug.
- If it is light brown and not wet, you don’t have any troubles with your spark plug.
- When you see black or other deposits in the insulated area, you have a problem that must be fixed.
- Remember to adjust the air mixture screw later on in the last steps of your tune-up.
- Scrape away any deposits you find on the spark plug, avoiding scratching its surface.
- Use a spark plug gap tool to adjust the gap to a width of 0.28 to 0.30 inches.
- Put the spark plug back into place and very gently tighten with the ratchet set, being very careful not to over-tighten.
- Put the wire and the cable back onto the spark plug and close your engine container.
These simple steps should help to provide your spark plug with a cleaner operating environment and get your engine running smoothly.
If you find that these steps don’t seem to help, you may want to reach out to a golf cart manufacturer or dealer to purchase a new plug to install in its place.
Step Five: Test Your Adjustments

By this point, your Club Car tune-up is just about done, but you cannot assume that they provided the adjustments that your cart needed to run smoothly.
Even professional mechanics carefully test any of the adjustments that they do to a car, cart, or other vehicle, to make sure that they properly work and don’t cause any troubles.
Thankfully, troubleshooting and gauging your adjustments is fairly simple and just requires you to hook up everything back to your cart and follow these steps:
- Put your cart into neutral and place cement bricks in front of and behind the wheels to avoid movement.
- Start up your engine and carefully press the accelerator pedal.
- Pay attention to how the engine revs as you lightly accelerate and decelerate.
- Listen for any troubles, such as a stuttering engine, a struggle shifting, or anything else suspicious.
- Stop accelerating the engine and note any struggles as the engine comes to a halt.
If you find that your cart is running about the same as when you did your tune-up, you may need to get expert help from a professional for a complete check.
By contrast, if your cart does run better but still seems to have some issues, repeat any steps on parts that you think may be causing this trouble.
Likewise, if you find that your cart runs almost as smoothly as it did when you purchased it, your job is done and you can enjoy your cart or park it for another day.


Leave a Reply
You must be logged in to post a comment.