At its basic level, golf is a game of patience and composure.
And sometimes that patience can be tried to its limits with things like broken or nonfunctioning equipment.
This certainly holds true for your golf cart and all the issues that entail it.
Having your golf cart sputter out in the middle of a game can be one of the worst things you can experience.
Luckily you can avoid these situations by checking your golf cart battery for early signs of failure and testing its current health.
This will give you a good idea of when to get your batteries replaced so you aren’t left stranded with issues.
We’ll be looking at some of the methods and techniques that you can use to do this down below.
How to Tell If Your Batteries are Failing
Batteries can give up on you at the drop of a hat.
They may fail spontaneously or have a long history of symptoms before they decide to stop working.
For the most part, a lot of batteries will show some common signs that give away their impending failure.
You can take note of these signs to make a preemptive step to do something about it.
Here are the signs you should be looking out for.
Charging is Inconsistent

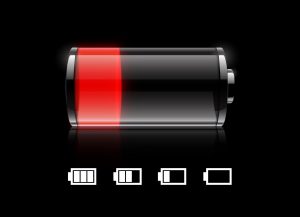
A perfectly working battery should be able to be charged to its maximum capacity and drain its load at a normal pace.
However, once you start seeing deviations in this, you can bet that something’s off with your battery.
If your battery refuses to charge past a certain point or takes too long to charge then this is a clear indication that it’s nearing the end of its life span.
Similarly, if it drains much faster than it used to, then it can be a sign of losing its life.
This is one of the most common and easiest tells of an aging battery that should be replaced soon.
When you start to experience this in the middle of a game, it’s usually better to just turn back and get the issue sorted out right away.
Little to No Power

When you get in a golf cart, you don’t necessarily expect it to give you the same amount of power as a Ferrari.
But you still want to feel like you’re actually moving somewhere and not just coasting.
And a lot of power issues can be traced back to your golf cart batteries.
Normally, getting soft movement in a golf cart is not a big problem for even the weakest batteries.
However, you should feel some difference if you put your foot down and get nothing in return.
If you’re maxing out the golf cart but not getting significant pickup then this is an indication that the battery isn’t able to provide the necessary juice to get you going.
And more likely than not, you’ve got a failing battery in cases like this.
Noticeable Visual Clues

For the most part, being able to tell when your battery is giving out is something that’s done using its performance as an indicator.
But despite this, you can notice some visual signs too when things get a bit dire.
In terms of golf cart batteries, it’s easy to see when they’re starting to go out.
Old batteries that are past their prime will start to bulge and bulk up often expanding to the point where they’re really noticeable.
When this happens, you can also notice the batteries split and crack from the constant pressure on them.
Some visual clues can be a bit more dramatic than others like corrosion on the metallic parts of the battery especially with areas like the terminals.
Another common visual sign is leaking acid coming from the battery itself.
These signs often indicate signs of a battery that is not only soon to be dead but one that could also pose harm to you or damage to your property.
Shorter Trips

If you notice that your trips are starting to become shorter and shorter by the day even on a fully charged battery, then it’s a pretty clear indication that you have a battery that isn’t working as well as it may have been when it was new.
Generally, you can find signs like your golf cart taking more charges to go the same amount of distance.
And if it struggles to go up steep inclines or hill climbs, then this is a good indication that your power is being limited by the low voltage that the battery can supply.
This could be just the signs you need to just replace your battery as soon as possible.
Quick Draining

Once you fully charge a golf cart battery, it should be able to last an appropriate amount of time-based on the capacity of the battery.
It’s not impossible to expect the battery to last you an entire game without coming up short or stopping on the way.
However, it’s likely that a faulty battery will drain much quicker than a battery with good health.
If you find that your golf cart starts sputtering and dying out in the middle of the game despite your best efforts to charge it, then this means something is amiss.
In almost any case like this, you can expect your golf cart battery to be past its prime working condition.
Failure to Start

One of the more dramatic signs that your golf cart battery isn’t what it used to be is if it fails to even startup.
There are a number of reasons why a golf cart fails to start but by far the most common one if battery failure.
Most golf carts out on the market today have a minimum voltage threshold that needs to be passed before they can start.
If your battery is old and weak, it may only give off a weak charge that won’t be enough to get the cart started properly.
How to Test a Golf Cart Battery
Not all batteries show obvious signs of aging before they go bad.
Some can just die off spontaneously without showing any visible signs or performing abnormally.
In cases like this, it’s hard to tell if your battery is actually bad just through symptoms alone.
This is why it can be important to put your battery through some important tests that you can use to find out for sure.
There are many ways of doing this and we’ll be looking at some of the most common testing methods below.
It’s important to remember here that you’re testing batteries that have acidic solutions in them.
This is why you should get the following safety equipment:
- Safety Gloves: Dowellife Cut Resistant Safety Gloves
- Protect your hand from cuts and abrasions---The high performance cut resistant material HDPE is adopted and the gloves is awarded with the highest EN388:2003 level 5 (EN388:2016 Level C) cut resistance certification. 10 times stronger than normal gloves.
- Excellent comfort and dexterity to wear and grip--- flexible operation, Not too hard, No sliding. The special high elastic nylon is blended to make the gloves fit your hand so well.
- Easy to keep clean and dry--- it is hand and machine washable and can be cleaned as kitchen dishwashing towel.
- More convenient to hang dry and replace--- One intimate designed hang ring is fixed on each gloves wrist.
- Now click the "Add To Cart" button to order to avoid 99% hand accidental injury for your family at kitchen cuts, oyster shucking, meat cutting, butter mandolin, vegetables slicing, fruits peeling, wood carving, carpentry and garden working .
- Safety Goggles: NoCry Safety Glasses
- STRONG, DURABLE DESIGN — Thanks to the tough, polycarbonate wraparound construction, these anti fog safety glasses for men and women offer superior protection from both direct and peripheral threats. They are the ANSI Z87.1 safety glasses women and men trust.
- LIGHT, COMFORTABLE AND ADJUSTABLE — These clear eye protection glasses have extendable arms and an adjustable soft nose pad so you always get the perfect fit. They're also armed with non-slip rubber grips so your mens safety glasses stays on.
- ULTRASHIELD LENS TECHNOLOGY — Compared to most clear protective glasses, the premium coating on our safety glasses anti fog is 5x more fog resistant and 2x more scratch resistant. No fog, no scratch, and zero optical distortion.
- 100% UV PROTECTION — The clear lenses of these protective glasses block 100% UV radiation. They make great lab safety glasses, shooting glasses, and work glasses for men. They’re great as construction glasses, medical safety glasses, antifog safety glasses and more.
- BUILT TO LAST — Your safety glasses for women and men come with a lifetime warranty. If there’s an issue, we’ll replace your saftey glasses or refund you because we stand behind the high quality of every product and we’ve got your back, no matter what.
Digital Volt Meter Method
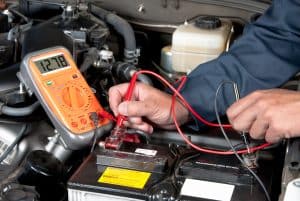
An auto mechanic
To start things off, this is a simple test you can use to determine if the battery has any voltage in it or not.
This won’t tell you anything complicated like if the battery is capable of working properly but it is a good starting point nonetheless.
To conduct this test you will need a digital voltmeter that’s capable of measuring the voltage in the battery.
For this, we recommend the MESTEK AC DC Current & Voltage Voltmeter
Alternatively, you can also use a multi-meter to do the same job like the AstroAI Digital Multi-meter
- Additional Tips - The following incorrect operations may cause the multimeter not to show results: Firstly, the plugs of test leads are not fully inserted or not inserted into the correct sockets. Secondly, the manual rotary switch is not placed in the correct position. In addition, this meter can not test all AC Current and below 100mV AC Voltage. Please check the user manual carefully before measurement.
- Versatile Digital Multimeter - Accurately measures AC/DC Voltage, DC Current, Resistance, and Diode. This Multimeter is a really useful tool for solving industrial and household electrical issues. Suitable for Household Outlets, Fuses, Batteries (including Vehicles), Automotive Circuit Troubleshooting, Charging Systems, Testing electronics in Cars etc.
- Troubleshooting with Accuracy - This Multimeter has a sampling speed of 2 times per second; Built-in a backlight LCD display with 3 ½ digits (1999 count) 0.6”, and high polarity including negative and positive readings.
- Ensures Safety - Double fuse is anti-burn and protects from overloading. The silicone cover can protect the multimeter from failing damage and prevent electric shocks. And low battery indication will be displayed when battery power is low.
- Ease of Use - Support Data Hold, Auto Shutoff and Continuity Buzzer. Includes Convenient feature like LCD Backlit Screen makes it easy to use in dimly light areas. Batteries/Set of Test Leads/User Manual are Included.
- Professional Technical Support Team - If you have any questions about the product, feel free to contact us! Our California-based support team will respond within 24 hours.
Required:
- Voltmeter or Multi-meter
- Safety goggles
- Safety gloves
Procedure:
- Make sure your batteries are properly seated inside the golf cart and all the terminals are properly fixed.
- Charge the cart batteries to their full capacity. This can take anywhere from 1-3 hours for a battery that is still relatively new and in good condition and over 9 hours for a battery that’s past a 5-year lifespan.
- Once you’re sure the battery is properly charged, take out your voltmeter or multi-meter and make sure it’s on and properly set up.
- Set your voltmeter or multi-meter to 200V DC with the adjustor knob.
- Take the two testing prongs and touch the black one to the ground or negative terminal while touching the red to the positive terminal.
- Look for a reading on the voltmeter or multi-meter.
- If it beeps or shows no readings, then your battery likely has no charge stored in it.
- Use this method to first test the whole battery bank then move on to the individual batteries themselves.
Results:
This method will make it clear if you have a charge on the battery or not.
It won’t tell you anything more than that like whether or not the battery will be able to hold the charge for long or what the charge actually is.
But if all you want to know is whether the battery can contain the charge before moving on to more accurate tests, then this is a useful method to use.
Hydrometer Method
A hydrometer is one of the more accurate methods of testing a battery because it gets down to the actual chemical condition of the battery itself and how good its condition is.
You can use this to test the battery’s health and how well it should be able to perform given its state.
To conduct the hydrometer test, you need a specific tool that is known as a hydrometer (not to be confused with a hygrometer).
You can find different types of hydrometer kits for sale whether it’s for testing home-brewed beverages, chemical tests, or testing batteries.
The E-Z Red SP101 Battery Hydrometer is highly recommended if you’re looking for a reliable and easy to use hydrometer.
- BATTERY HYDROMETER: This battery tester is made to stand up to tough treatment in service stations & garages. It's designed so that both customer & technician can see the state of the battery acid..Fit Type: Universal
- RUGGED & EASY TO USE: This hydrometer makes reading & understanding battery levels easy, accurate, & quick, with no difficult float reading & no temperature tables required.
- ACCURACY & RELIABILITY: With a range of 1. 100 – 1. 300, you can confidently know the state of charge for the battery cell. Great for use by professional battery techs, mechanics, or anyone else.
- INNOVATION AT ITS FINEST: We make high quality hand tools & accessories, tool organizers, ratchet sets, LED flashlights & work lights. We specialize in tools for battery, heating & electrical work, for both the professional tradesperson and home DIY'er!
- THE EZRED DIFFERENCE: Leading with innovation, our focus is to design, manufacture & deliver the most functional & durable professional grade tools & lights. Get the job done with EZRED tools!
Required:
- Hydrometer
- Safety goggles
- Safety gloves
- Calculator or a notepad and pen
Procedure:
- Fully charge the battery to its maximum capacity.
- Dip the hydrometer in and get a preliminary reading. A new battery will have a reading of 1:280 while a used battery will be around 1:277 at full charge. If you battery is uncharged, it will give off a reading of anywhere from 1:100 to 1:200.
- Dip the hydrometer several times into the battery again and again. This will allow the hydrometer to adjust itself to the temperature of the battery.
- Finally, dip it in again and get a decent amount of the battery fluid to get into the hydrometer. You want enough fluid to keep the float inside the hydrometer floating with touching the top or bottom of the hydrometer cylinder.
- Carefully take the hydrometer out and keep it vertical at all times.
- Observe the place where the float meets the battery fluid, note this reading down.
- If your hydrometer doesn’t allow temperature adjustment then you need to do it manually by adding four points to the reading for 6°C the temperature of the battery is above 27°C and removing four points for every 6°C the temperature of the battery is below 27°C.
- Repeat the process for every cell in the battery until you have a reading for all the individual cells, note them all down.
- Compare the readings between each cell to find out if your battery is good. If there’s a difference of more than 50 points or 0.050 between any two cells of a charged battery, then it’s likely gone bad.
Results:
This method proves with great accuracy what the actual chemical condition inside the batteries is.
Almost all golf cart batteries are made up of two things: sulphuric acid and water.
The concentration between these two is extremely important and it is what determines if the battery can hold a charge.
If your sulphuric acid concentration is low, then that means the density of the electrolytic fluid inside the battery is low too.
The less dense your battery fluid is, the less likely your battery will be capable of holding a charge.
If two cells have a drastically different density between them, then this is a good indication that the conductance between cell to cell to won’t be as much as it’s supposed to be.
This is a very clear cut indication that your battery has gone bad and needs to be replaced.
Load Tester Method
This is one of the fastest and most accurate battery testing methods that you will be able to find.
The load tester uses a coil attached to a voltmeter that puts the battery under load.
This can let you observe the behavior of the voltage under the load to determine what it can exhibit in terms of its condition and battery health.
To use the load tester method, you need a loading battery tester that can provide the necessary load to the battery.
For this method, we recommend the CARTMAN Loading Battery Tester
No products found.
You will also need a digital voltmeter like the MESTEK AC DC Current & Voltage Voltmeter
Required:
- Load Tester
- Safety Goggles
- Safety Gloves
- Digital Voltmeter
Procedure:
- Make sure the batteries can hold a charge before you begin. Batteries that don’t hold charges can’t be properly tested with a load test method.
- Charge the battery properly to its maximum possible capacity.
- Let the battery rest for a bit after it’s charged until it can cool down to reach room temperature.
- Check the battery’s voltage each time you conduct a new test with a digital voltmeter.
- Apply load on the battery based on its capacity.
- Load the battery to their listed Ah or Amp Hour rating, you can find these on the sticker of the battery itself or by going online and looking at your specific battery brand and model. Generally, the ratings are as follows:
- For a 6 volt battery, you have 210-225Ah
- For a 8 volt battery, you have 165-170Ah
- For a 12 volt battery, you have 150Ah
- Watch for the battery’s behavior at the advertised capacity under the load voltage
- Compare the results with the stated limits. A drop of 3 volts or less is considered well within the normal limits. However, if you see a drop of 5 volts or more then this indicates a bad battery. Here are the results you should expect from most batteries:
- At its 20hr Ah rating, a 6-volt battery should maintain 5 volts for 15 seconds.
- At its 20hr Ah rating, a 8-volt battery should maintain 7 volts for 15 seconds.
- At its 20hr Ah rating, a 12-volt battery should maintain 11 volts for 15 seconds.
Results:
Load testers work by generating heat through the resistance of electrical current passing through the battery.
The load tester’s coil completes a circuit when you press the button and forces the battery to work while being under load.
This gives you results that you wouldn’t normally get if you were just testing the battery on its own.
A load tester will quite accurately help you predict what kind of output you will expect out on the course when you’re actually driving your golf cart.
Unlike other methods, it gives you real-world results aside from those you get as an expected result.
Discharge Machine Method
Although this method is one of the most accurate methods for battery testing, it’s not possible for an average person to carry out.
For one, you will need a discharge machine to carry out the test which can be quite expensive and not something that will be easily accessible to you.
In terms of the process, it’s a lot similar to the load testing method where a coil is used with the battery.
The discharge machine provides a 75% amp load on the battery. It then measures just how many minutes of load the battery could move before it hit 75%.
To carry out this test, you will need to take your battery and bring it to your nearest mechanic or auto workshop.
If they have the necessary equipment, they will be able to test your battery and tell if you if it has gone bad.
Why Your Golf Cart Battery Might Fail
A failing battery can occur at any time with little to no warning.
And usually, there isn’t a single reason for a why a golf cart battery might fail.
However, there are a couple of reasons why you can expect your golf cart battery to give out.
Here are some of the reasons why you can expect your average golf cart battery to fail.
Aging of the Battery
A battery is like any other component in your golf cart in that it has a limited lifetime.
Sooner or later, you can expect the battery to fail with age.
That’s why it’s always a good idea to check the dates on the battery when you buy them just to be sure you don’t get anything that was sitting in storage for years.
Little to No Maintenance
With batteries, you have to make sure that the battery fluid inside is up to the proper levels as well as making sure that you clean the corrosion off your terminals.
Having a battery with little to no maintenance can slowly eat away its life.
Improper Charging
Charging a golf battery requires a charger that can give out the appropriate volts and amperage that your battery needs to recharge.
However, if you use a low-quality charger or one that doesn’t meet the recommended specs, then you can expect your battery to die faster.
Unsuitable Use
Different sized golf cart batteries are designed for different reasons.
You can’t put a small golf cart battery with limited power into a larger golf cart and expect it to keep up with hill climbs. Repeated abuse like this can easily kill your battery.
Improper Installation
Not installing your battery properly can lead to damage to the terminals and the contacts which leads to poor performance and even permanent damage.
Overcharging
If you charge your battery beyond its limit, it can lead to issues like excessive heat which causes the battery to dry out and in some cases can even contribute to electrical fire hazards.


Leave a Reply