In a best-case scenario, your golf cart battery should last for years without needing any serious maintenance.
But some issues may require serious work, such as managing sulfation.
Thankfully, there is a way to desulfate this battery to ensure that it can last for much longer than it would otherwise.
The Cause of Sulfation
Golf cart batteries go through a series of chemical changes as they operate and age, and these processes can be both good and bad.
For example, aging batteries and those that are not charged that often may end up sulfating on a cart owner.
Sulfation is a chemical process that occurs when the battery is low on power and occurs because there is no power preventing it from happening by stimulating the acid in the cells.
Typically, sulfation causes a handful of different issues that can be quite frustrating.
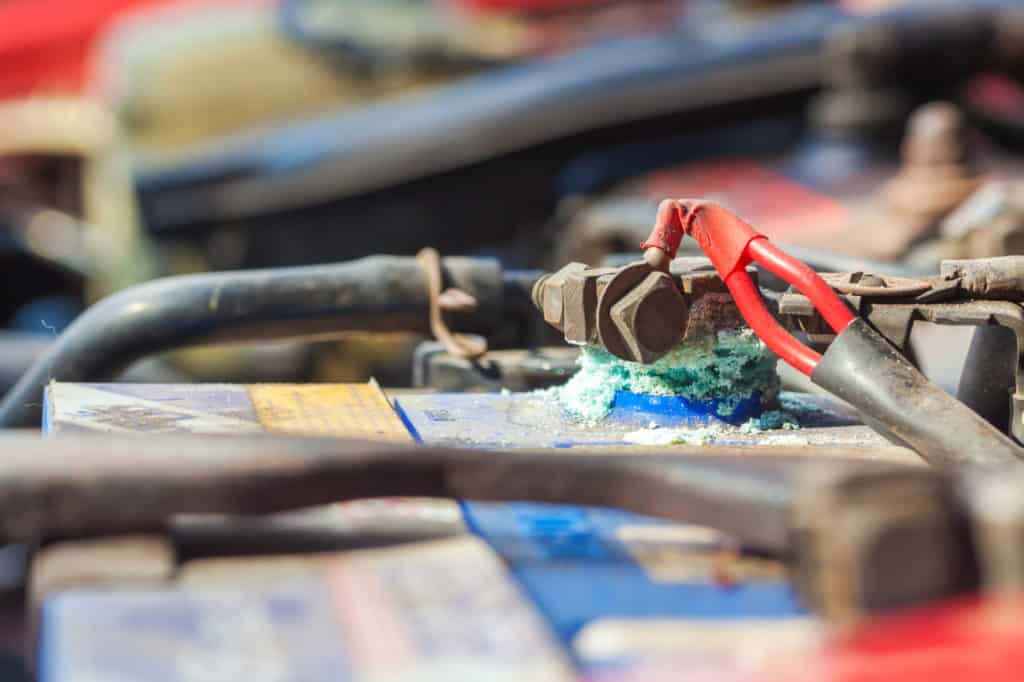
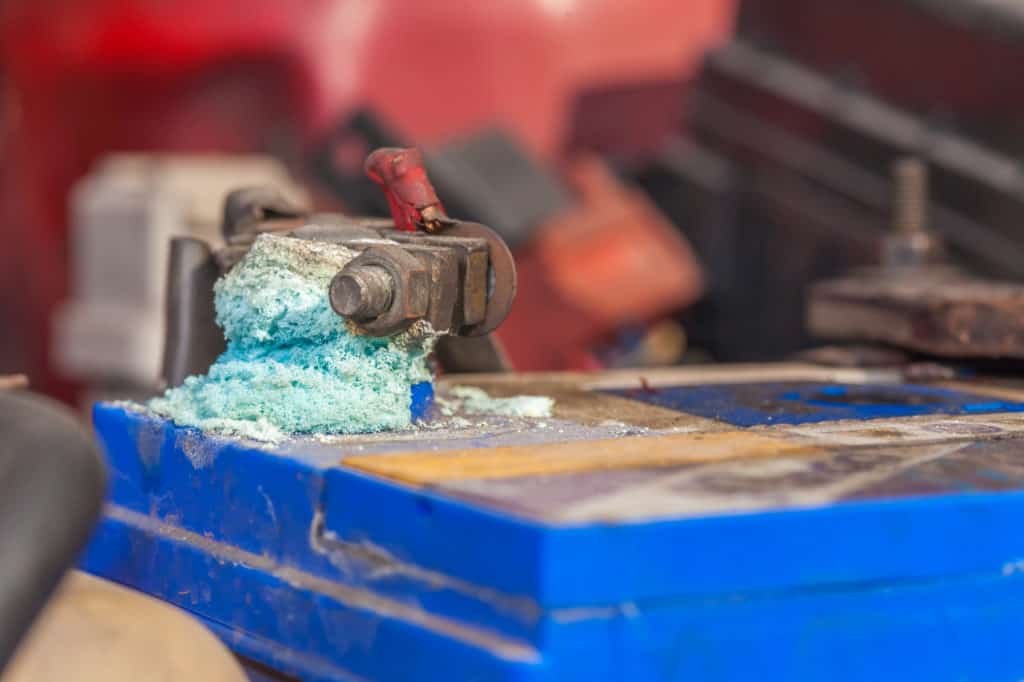
For example, you’ll start to see crystals on the surface of your battery cells interior – these crystals often start small but grow in size quite quickly.
And as they grow, they prevent your cell from holding onto a charge and can cause the battery to malfunction and run poorly, triggering early degradation of your battery.
The frustrating thing about this process is that it can be prevented more easily than you may expect.
That’s because it typically occurs when you leave your batteries in a nearly discharged state or do not charge them for a long time.
Six months can be a short enough time for sulfation to start appearing on your batteries, so you need to make sure that you take control of this situation right away.
Prevention is the best course here – if your batteries haven’t sulfated yet, charge them up and keep them as charged as needed.
Don’t overcharge them but don’t leave them nearly or completely discharged, either.
If your battery has to sit for an extended period, a trickle charger may help – this charger helps to prevent sulfation by keeping your batteries at a prime state for an extended time without overcharging.
That said, there may be a situation in which you need to desulfate your batteries.
And you should do this sooner rather than later – time is your enemy in this scenario.
If you wait too long and let your batteries continue to sulfate, they can become so damaged that desulfation cannot fix them.
Thankfully, you should be able to handle this process quite easily and with minimum help from professionals.
Tools That are Needed
When you want to desulfate your golf cart battery, there are just a handful of different tools that you’ll need for this process.
Thankfully, most people should be able to handle this process with little difficulty, as long as you understand how to open up your battery and handle a few simple tools.
First of all, you’ll need a screwdriver that is appropriate for your battery and its cover.
The type that will be suitable will vary according to your cart and its design.
For example, some batteries may need a Philips screwdriver – with a “star” head” – or a standard screwdriver.
You rarely need any other type, thankfully, because these are the most common types that you’ll run into in this situation.
You’re also going to need at least a gallon or two of distilled water – and NOT any other type of water.
Distilled water removes all of the minerals and metals from H2O and ensures that it doesn’t cause any issues with your battery.
If you use tap water, there is a good chance that you’re going to damage the battery cells and cause a lot of issues that may require you to get a completely new cell.
And you’ll also need an appropriate battery charger that is designed specifically for that battery.
You don’t want to use a more generic charger or one that is designed for other batteries.
While it may give you some charge and could work in a desperate situation, it may also cause damage to your battery and, particularly during this process, can be a concern that makes it worth avoiding.
You also need to take several safety steps before you start working on your battery to ensure that you don’t get injured.
We suggest removing all of your jewelry and putting on old clothes.
Next, put on a pair of rubber gloves that can withstand the wear and tear of battery acid.
Lastly, put on a pair of protective goggles that easily cover your face and protect you from any injury.
How to Desulfate Golf Cart Batteries (Step-by-Step)
Once you have gathered up all of your tools and are ready to desulfate your battery, just follow the steps below to get the job done.
We have packed as much detail as we can into each step to ensure that you can follow these steps with no difficulty.
And we also paid careful attention to anything that may be confusing about this process to ensure that you can finish it with ease and in no more than an afternoon or so.
1. Open Up the Battery
Start out by locating your battery on your golf cart.
In most cases, you’re going to find it underneath of your back seat.
If for some reason your battery is not here, it may be in a panel on the side of the cart.
This location is much rarer than under the seat but is present on some models.
Use your screwdriver to remove any panels that must be taken off to get access to your battery.
Now, open up the battery cover panel to get access to the cells of the battery.
You should be able to pry open this cover quite easily with the flat edge of a screwdriver or with your fingernail.
Once the top cover has been pulled off, you can disconnect the black battery cable and place it to the side.
Doing so keeps you safe as you work by avoiding charges or electrical discharge from the cells.
At this point, you should have easy access to your battery interior and should be able to see the sulfation on your cells.
You may be tempted to reach in with a screwdriver and break apart these crystals but do not make this mistake.
Doing so may cause damage to the cells and cause more harm than good.
Instead, start looking at the cells of your battery for an idea of what to expect here.
2. Examine Your Cells
Look inside of the cover of your battery at the metal cells on the bottom of the battery interior.
These metal cells should be very easy to notice and obvious – they’ll stick up through the water and battery acid and will have sulfation crystals on them.
Once you have spotted these cells, take a look at the crystals on them to get an idea of whether or not your battery can be saved or not from them.
Look for tiny crystals that have yet to completely cover your cells.
They are likely to be a dirty yellow and shouldn’t be big enough to completely damage your battery.
If you see these crystals, you are in luck because sulfation is possible.
You can skip to the next step if your crystals are at this state because you don’t need to learn more about what to do if the crystals are too big for desulfation to handle.
If you find that any of your cells have large crystals or a majority of them are covered by large crystals, you’re going to need to replace your battery.
There just isn’t much that you can do in this situation to save your battery.
And make sure to check all of your cells too – just because a majority of your cells aren’t affected, that doesn’t mean large sulfation isn’t present on one cell.
And if it is, you need to get a new battery – there’s just no way around it.
3. Add Distilled Water
Here comes the hardest part of this process – adding an appropriate amount of distilled water to your cell.
You’re going to add water to your battery for a few reasons.
First of all, the water helps to focus the electrical charge and make it more effective.
And it also helps to break apart the sulfation crystals using the power of water, which is often quite strong in these issues.
Start by looking at the sides of your battery tank for a line that indicates how much water you should add to your battery.
Pour distilled water into your tank slowly – you may want to use a funnel to avoid spills – and make sure that the water reaches this level.
When it does, your cells will be completely covered and you should see little of the distillation noticed earlier on your battery.
Now, when you charge up your battery, the water will help the cells warm up more and collect the sulfation crystals – once in the water, these crystals are harmless.
You may even see some sulfation crystals break apart as you pour the water into the cells.
And when replacing your battery covers, keep them half unscrewed to avoid excessive pressure buildup in the battery that may be damaging.
4. Charge Your Battery
Once you have completely added the distilled water you need to add to your battery container, you need to replace your cell covers and plug your golf cart into your battery charger.
Make sure that you use a charger that has a low-level for its variable setting.
You don’t want a fast charge here because fast speeds won’t work nearly as well.
Instead, set it to the lowest possible setting and get ready to wait.
Once you turn on the charger, the electricity will work through the water and the cells and break apart the sulfation crystals.
Once broken apart, these crystals just disperse in the water and acid and become harmless.
You don’t need to sit there and watch your battery during this process – instead, you can go do other things but should check on it periodically throughout the charging period to avoid issue.
After the battery is completely charged, unplug the charger and remove the battery cell covers.
Look inside of the battery to see how well the desulfation worked.
You should see that much of the yellow crystals have broken up – you might even see that most of them are gone.
And if there are still a few crystals on them, try your battery anyway – it should have a stronger performance after the desulfation process.


Leave a Reply
You must be logged in to post a comment.